

If you are on the Client Reporting plan, you are able to set up SAML-based single sign-on (SSO), giving your users access to Slemma through an Identity Provider (IdP) of your choice. You can choose a SAML 2.0 Identity Provider (IdP) to set up authentication within your secure network.
Once SSO is enabled for a certain team, its users are not able to edit their account names in Slemma. First name and last name are assigned by your Identity Provider.
Configuring SSO
Step 1: Configure your Identity Provider
First, go to your Identity Provider’s configuration panel and follow the provider’s instructions to configure Single Sign-On for the Slemma app. Please note, that Slemma uses SAML2 with the HTTP Redirect binding for SP to IdP and expects the HTTP Post binding for IdP to SP.
Here are the SAML parameters you’ll need:
- the launch URL: https://slemma.com/acs (or https://yoursite.com/acs if you use custom domain)
- the NameID containing the user’s email address
- additional attributes to be sent with the SAML assertion: FirstName, LastName
- a signed SAML assertion
Step 2: Configure SAML 2.0 for Slemma
- Login to your Slemma account as an administrator.
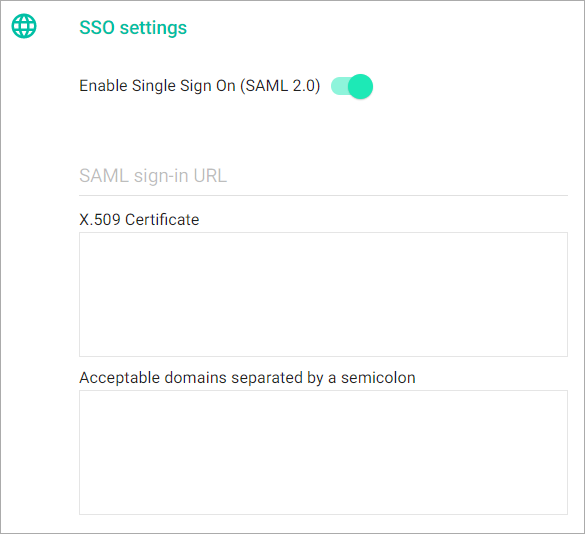
- Navigate to Admin > White label, enable Single Sign On (SAML 2.0), then specify the following information:
- SAML Sign-in URL: Sign into your Identity Provider Admin Dashboard, open the configurations settings of the Slemma app, find and copy&paste this variable into Slemma SSO settings.
- X.509 Certificate: Sign into your Identity Provider Admin Dashboard, open the configurations settings of the Slemma app, find and copy&paste this variable into Slemma SSO settings.
- Acceptable domains separated by a semicolon: Specify email domains to be allowed to authenticate via your SAML server. Public domains (e.g. @gmail.com, @outlook.com, etc.) are not allowed.
- Save changes.
NOTE: Just In Time (JIT) Provisioning is enabled by default. If you use SSO, users are added in your Team on the fly the first time they try to log in. This eliminates the need to create user accounts in advance. You don’t need to manually create the user in Slemma. When they log in with Single Sign-On, their account is automatically created for them, eliminating the time and effort with on-boarding the account.
Notes:
- The following attributes are supported:
- FirstName
- LastName
- SP-initiated flows, IdP-initiated flows, and Just In Time (JIT) provisioning are all supported.
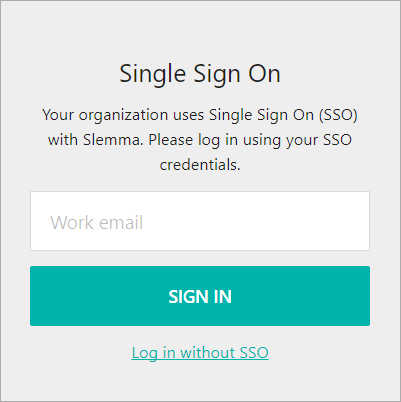
For SP-initiated Flows
- Go to https://slemma.com/saml-auth (or https://yoursite.com/saml-auth if you use custom domain).
- Enter your email, then click Sign in:
For IdP-initiated Flows
- Log in to your Identity Provider Dashboard.
- Find and click the Slemma app.