

The Dataset editor allows you to do a ton of different things to your dataset including: establishing automatic updates, changing field names, and changing field types. There are two times when you will see it:
- When you first create the dataset.
- Anytime you need to make changes to the dataset, click the dataset in the list and choose Dataset editor.
Dataset editor differs for imported data and for the DB connections by virtue of the integration features. Let’s go through the features of Dataset editor in each case.
- When importing data
- When editing a dataset with imported data
- When creating a dataset on DB integration
- When editing a dataset on DB integration
When importing data
When you are first importing the data, you will see something like this:
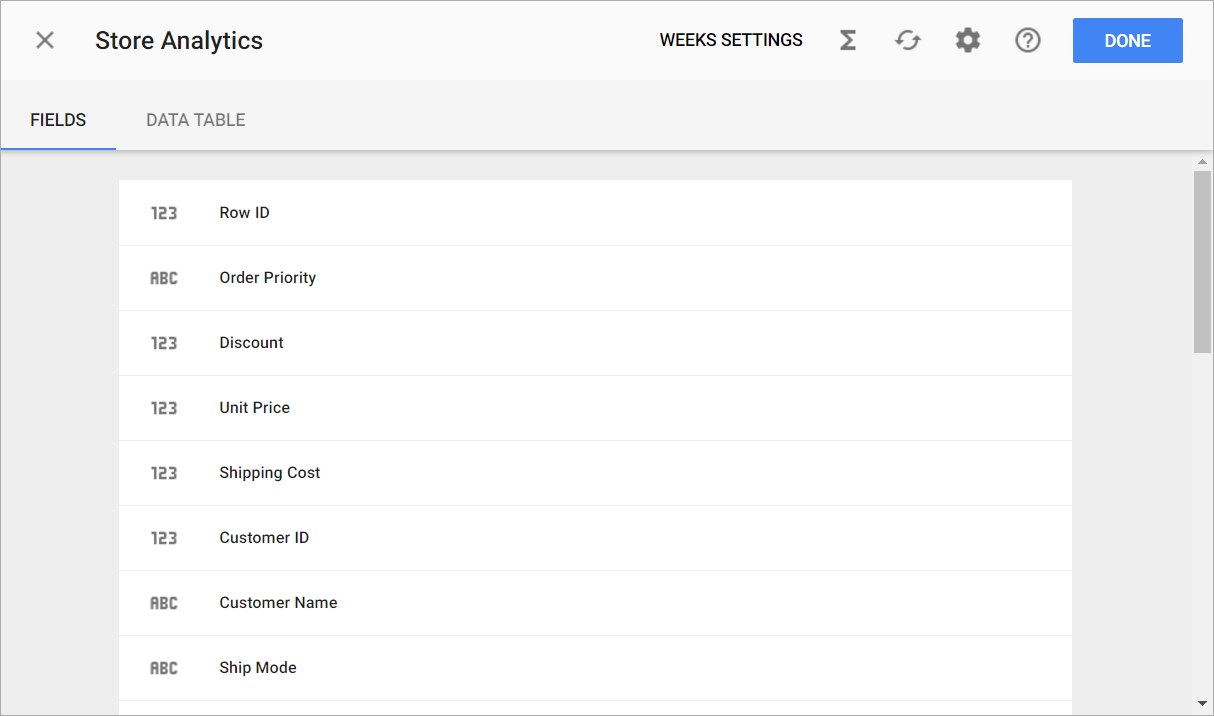

On the first tab FIELDS, there is a list of available fields in this dataset. Click on the field to enable the Field settings window.
On the Field settings window you can:
- edit field name
- change the field type
- prevent a field from displaying in the Chart editor
- change number format (available for the number field type)
- set the hierarchy level of displayed date (available for the date field type)
- set the appropriate map (available for the geography field type)
- specify the custom attribute if needed (read more about custom attributes)
- select the checkboxes for the distinct-count measure or split functions if needed (available for string and geography field types)
The same Field settings window appears by clicking the fields on the DATA TABLE tab of the dataset.
The table below provides the common information on existing field types for imported data:
| Field type | Icon | Description |
| Number | Represents numeric or quantitative values. They are used to create measures. | |
| String | Represents categories by which you group your measures. | |
| Date | Represents dates or dates and time. Select this type if you have time data to see how measures are changing over time. | |
| Geography | Represents geospatial data. Mark the field as geographical if you have location data and would like to create maps. |
Let’s consider now the options available on the top right corner of the dataset:

Weeks settings
Specify the first day of the week and select the standard for numbering weeks in a year. Please head over to this article to see more info about weeks settings.
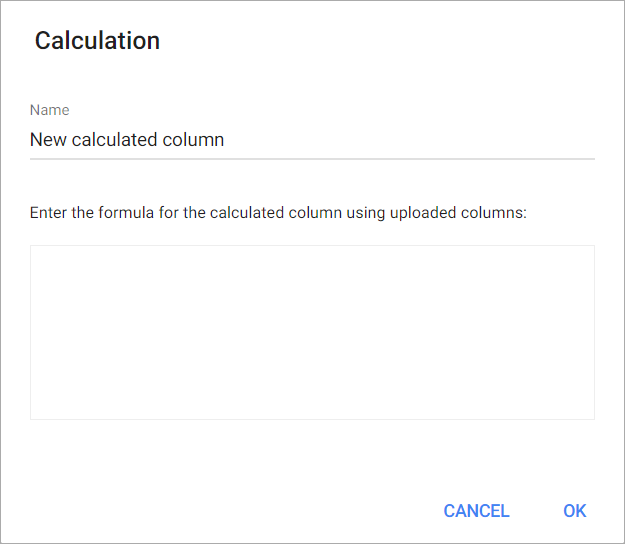
Add calculation
Use the Add calculation (![]() ) button to add a calculated field to your dataset.
) button to add a calculated field to your dataset.
In the appeared window, you may set a name of a calculation and insert a desired formula in the Formula box.
To add a calculation to the imported dataset, use Postgres syntax of SQL.
Depending on the chosen function, calculations will return the result for each row of the selected column (e.g. Abs) or return a single value, calculated from values in a column (e.g. Max).
In the formula, you may specify what type of a calculted field you want to create (Number, String, Date).
After you’ve finished with the formula creation it will appear in your field list and as a column in your data table. Click on the calculated field to edit it.
You may specify the format of the calculated field. To do this, click on the three dots button in the row with the calculation on the Fields tab and choose Settings. Depending on the type of the calculated field, the appropriate Field settings window will open.
To remove the calculation, choose the Delete option by clicking on the three dots button.
In the Chart designer, you may use the newly created calculation along with the other dimensions and measures to build a chart.
To learn more about calculations in Slemma and the differnce between calculations on the dataset level and on the chart level, head over to this article.
Refresh data
When importing data from cloud storage, you can establish automatic updates. Simply click the ![]() button, and the Refresh data pane will appear. Click through Update rate and select the desired frequency, time and time zone of the updates. Head over to this article for more info on data refreshing.
button, and the Refresh data pane will appear. Click through Update rate and select the desired frequency, time and time zone of the updates. Head over to this article for more info on data refreshing.
Please bear in mind that this option will not reflect the changes of the data source structure (added/removed/renamed columns). It will only update values in the existing columns. Still, if you’ve changed the structure of your data source, you should let Slemma know about it manually when editing a dataset. Read the article below for more info.
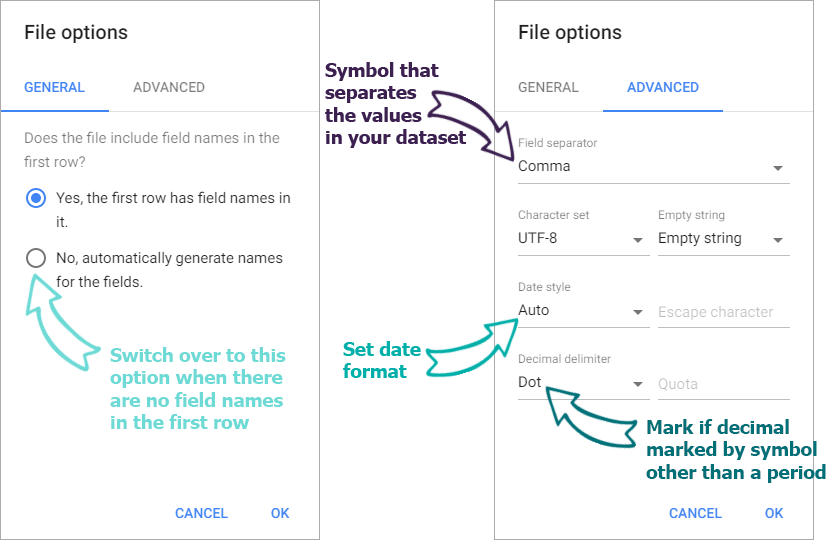
File options
The File options (![]() ) window has several options of which you should be aware. Most of them are self-explanatory, but you can use the image below just in case.
) window has several options of which you should be aware. Most of them are self-explanatory, but you can use the image below just in case.
Help
The Help (![]() ) button enables you to open the Support chat (
) button enables you to open the Support chat (![]() ) where you can ask any questions about using Slemma or the Slemma Knowledge base (
) where you can ask any questions about using Slemma or the Slemma Knowledge base (![]() ) where you can find a bunch of useful articles.
) where you can find a bunch of useful articles.
When editing a Dataset with imported data
To open the Dataset editor of local files and files imported by URL, head over to the Data sources page, choose Files, click the desired file and select Dataset editor.
To open the Dataset editor of Cloud storage, find the Cloud storage integration on the Library page or on the Data sources page, click it and choose Browse datasets. In the appeared window, at the top, you’ll see existing datasets of the selected Cloud storage integration. Click the desired one and choose Dataset editor.
Notice that this looks similar to what we were looking at earlier.
NOTE: Please don’t rename fields in the dataset after they were used in charts/filters/calculations etc. Renaming will cause troubles with recognizing these fields in the created objects.
When you open the Dataset editor, the File options (![]() ) button is not available anymore. But you may notice three additional buttons that were unavailable when you first imported data.
) button is not available anymore. But you may notice three additional buttons that were unavailable when you first imported data.
Update field list from Cloud
Click this button if you’ve changed the structure of your data source (add/remove/rename columns). When you click this button, Slemma reloads not only the values, but the entire structure of the table. After that, the Refresh data feature will update data (values) according to the new structure of the table.
Please be careful with structure changing! Once the structure of a dataset is updated, existing charts can break (e.g. if charts use the columns that have been removed or column titles that have been changed).
Choose a file
Use this button to reconnect the dataset to a new source file on the Cloud storage.
This button may be useful for you when:
- You replaced your source file and don’t want to loose the connection with it.
- You need to create several identical dashboards on different datasets (with the same structure). Go here to explore more details about this specific case.
Download CSV
This option enables you to download your dataset in the CSV format. Please note that all the calculated fields will be downloaded too.
When creating a Dataset on DB integration
When you are first creating a dataset on the DB integration, you will see something like this:
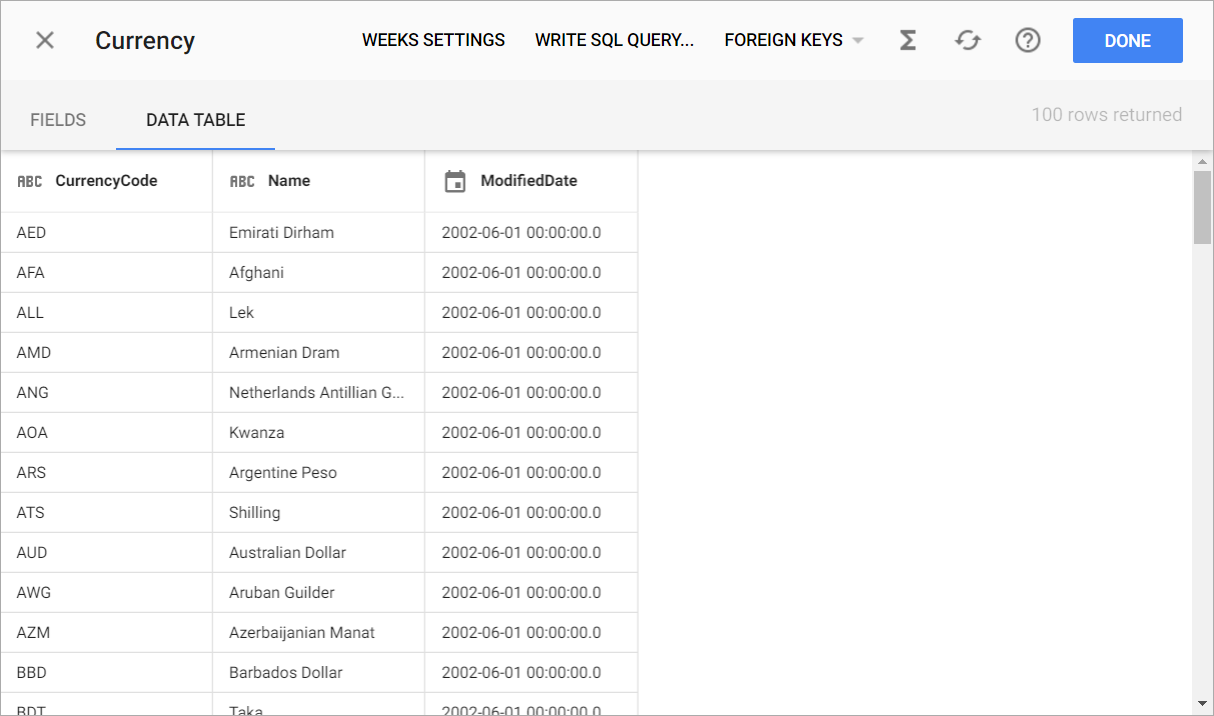
On the first tab FIELDS, there is a list of available fields in this dataset. Click on the field to enable the Field settings window.
On the Field settings window you can:
- edit field name
- change the field type
- prevent a field from displaying in the Chart editor
- change number format (available for the number field type)
- set the hierarchy level of displayed date (available for the date field type)
- set the appropriate map (available for the geography field type)
- specify the custom attribute if needed (read more about custom attributes)
- select the checkboxes for the distinct-count measure or split functions if needed (available for string and geography field types)
The same Field settings window appears by clicking the fields on the DATA TABLE tab of the dataset.
The table below provides the common information on existing field types for the dataset created on the DB connection:
| Field type | Icon | Description |
| Number | Represents numeric or quantitative values. | |
| String | Represents categories by which you group your numbers. | |
| Geography | Represents geospatial data. Mark the field as geographical if you have location data and would like to create maps. | |
| Date | Represents dates or dates and time. Select this type if you have time data to see how measures are changing over time. |
NOTE: The column with geospatial data should be named as “ISO”.
Let’s consider now the options available on the top right corner of the dataset:

Weeks settings
Specify the first day of the week and select the standard for numbering weeks in a year. Please head over to this article to see more info about weeks settings.
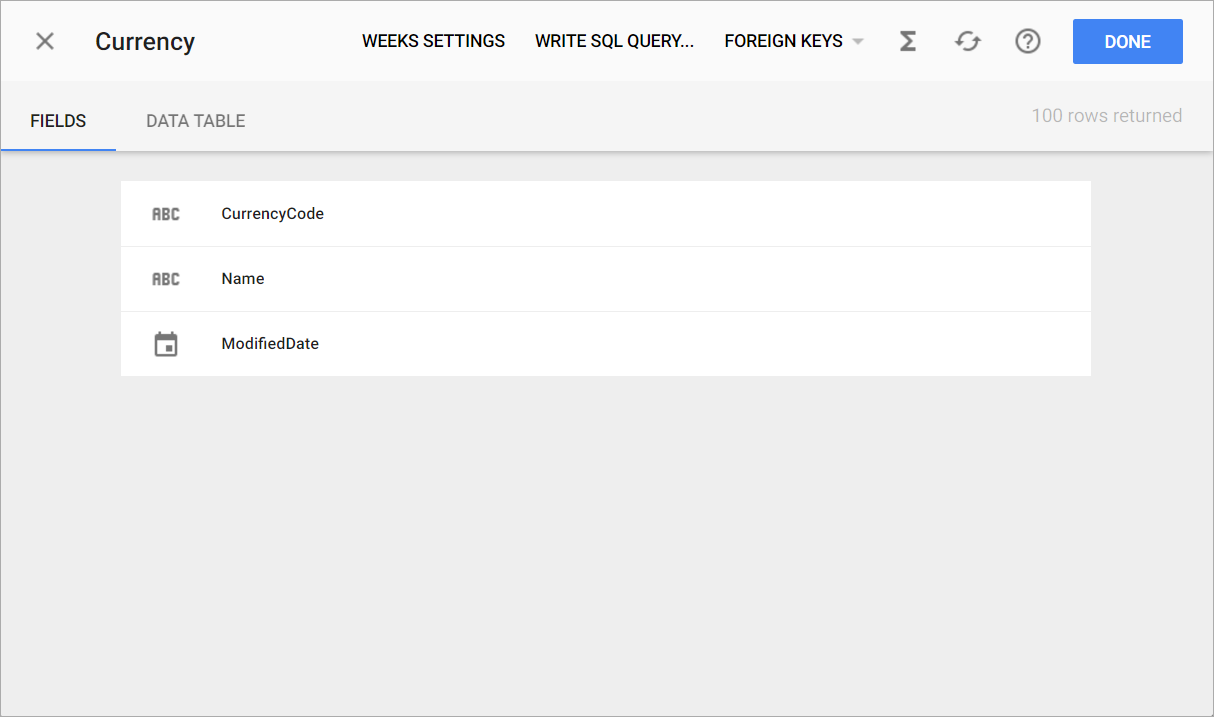
Write SQL query
Write a SQL query to retrieve data from different tables. When you choose this option, you will see something like this:
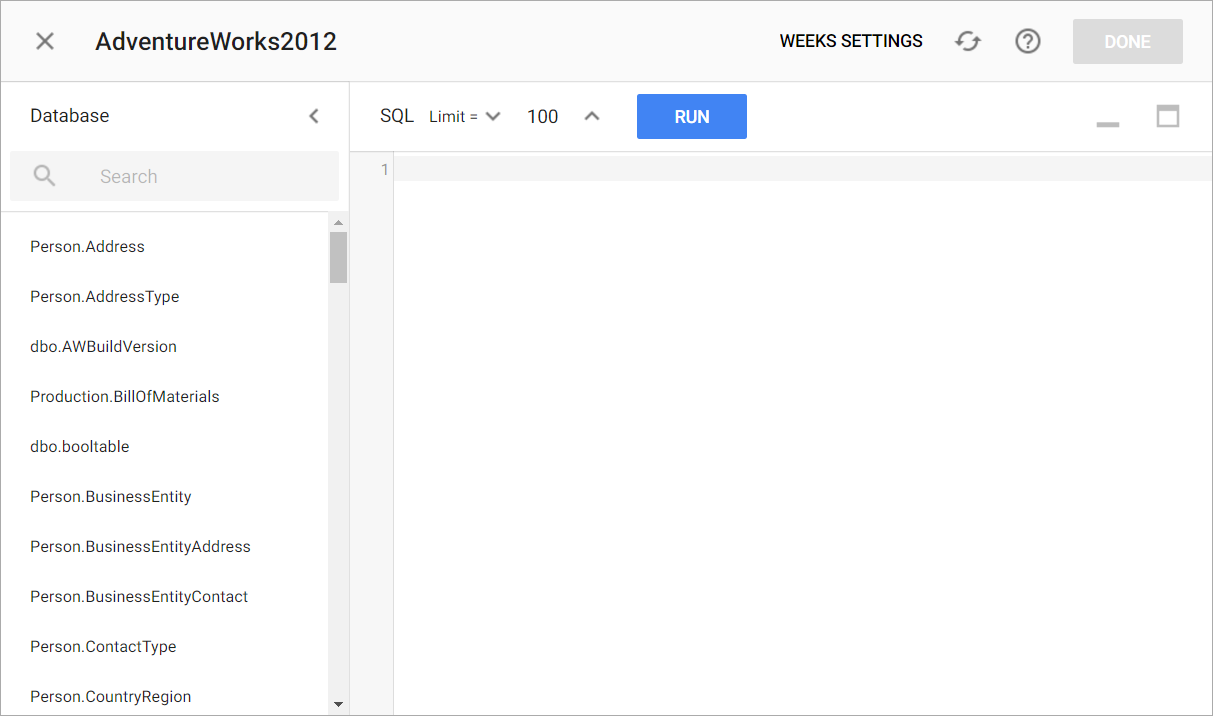
Use the SQL Limit setting to change the number of rows to display in the dataset. This limit affects only the data displayed in a preview (Dataset editor). It won’t affect the data in your charts.
Foreign keys
Use foreign keys between tables.
Add calculation
If you want to insert a calculation to the dataset on a database, use SQL functions supported by your DBMS.
The process of adding calculations to dataset on DB is the same as to dataset on the imported file. Please head over to the article above to see more info about calculations.
Refresh data
The Refresh data (![]() ) button enables you to establish automatic updates. In the appeared dialog window, click through Update rate and select the desired frequency, time and time zone of cache flushing. Head over to this article for more info on data refreshing.
) button enables you to establish automatic updates. In the appeared dialog window, click through Update rate and select the desired frequency, time and time zone of cache flushing. Head over to this article for more info on data refreshing.
When editing a Dataset on DB integration
To open the Dataset editor of a database, find the database integration on the Library page or on the Data sources page, click it and choose Browse datasets. In the appeared window, at the top, you’ll see existing datasets of the selected database integration. Click the desired one and choose Dataset editor.
Notice that this looks similar to what we were looking at earlier.
NOTE: Please don’t rename fields in the dataset after they were used in charts/filters/calculations etc. Renaming will cause troubles with recognizing these fields in the created objects.
Using Aliases
When writing SQL query, please use SQL aliases to give a calculated field a temporary name.
Basically, aliases are created to make the column selected more readable.
SQL alias syntax for columns is the following:
SELECT column_name AS alias_name
FROM table_name;
For example:
SELECT DISTINCT Product, Amount/Quantity AS AvgPrice FROM Sumproduct
NOTE: For more information about using aliases follow this link.